How to Sign In to WhatsApp Web on Your Phone In 2024
WhatsApp Web is a convenient tool that allows users to access their WhatsApp account from a web browser on their computer. It’s a handy feature for those who prefer typing on a full keyboard or need to multitask between their computer and phone. If you’re looking to get started with WhatsApp Web, here’s a step-by-step guide on how to sign in using your smartphone.
Table of Contents
Step 1: Open WhatsApp on Your Phone
The first step is to launch the WhatsApp application on your smartphone. Ensure that you are using the latest version of WhatsApp to access all the latest features and improvements.
Step 2: Navigate to Linked Devices
For Android Users: Tap on the “Menu” button (usually represented by three dots in the top right corner).
For iPhone Users: Go to “Settings” within the WhatsApp app.
Step 3: Select Linked Devices
Once you’re in the settings menu, look for an option labeled “Linked Devices” or similar. This is where you’ll manage the devices connected to your WhatsApp account.
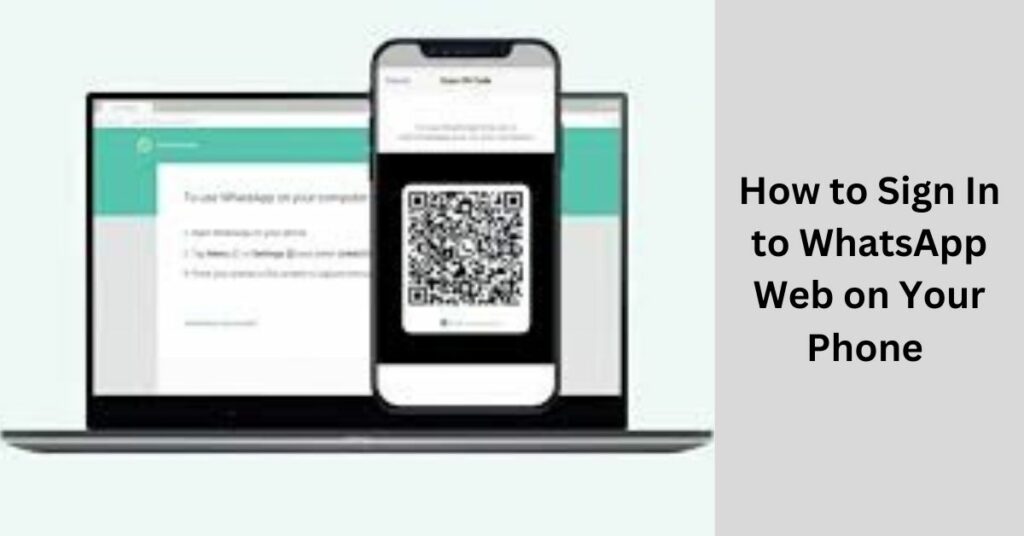
Step 4: Scan the QR Code
After selecting “Linked Devices,” your phone will activate its camera. This step is crucial as you’ll need to scan the QR code displayed on the WhatsApp Web login page.
Step 5: Scan the QR Code
Position your phone so that the camera can clearly capture the QR code displayed on the WhatsApp Web login page. Ensure that there’s adequate lighting and that the QR code is within the camera frame.
Step 6: Wait for the Session to Start
Once the QR code is successfully scanned, the session will initiate automatically. You’ll be logged into WhatsApp Web on your computer, and you can start messaging right away.
Understanding the Sign-In Process in Detail:
Now, let’s delve deeper into each step of the sign-in process to provide a comprehensive understanding of how to access WhatsApp Web using your smartphone.
Step 1: Open WhatsApp on Your Phone
Launching the WhatsApp application on your smartphone is the first crucial step. This ensures that you are ready to initiate the process of connecting to WhatsApp Web. If you haven’t already downloaded WhatsApp, you can find it on the Google Play Store for Android devices or the App Store for iPhones. Once installed, open the app and proceed to the next step.
Step 2: Navigate to Linked Devices
Android and iPhone users may have slightly different navigation paths within the WhatsApp application. For Android users, tapping on the “Menu” button, typically represented by three dots in the top right corner, will reveal a dropdown menu. Within this menu, you’ll find the option to navigate to “Linked Devices.” On iPhones, accessing the “Settings” section within the WhatsApp app will lead you to similar options.
Step 3: Select Linked Devices
In this step, you’re essentially accessing the settings related to connected devices within your WhatsApp account. This is where you manage the devices linked to your WhatsApp, including WhatsApp Web sessions. By selecting “Linked Devices,” you’re indicating your intent to add a new device to your WhatsApp account, in this case, your computer via WhatsApp Web.
Step 4: Scan the QR Code
Scanning the QR code displayed on the WhatsApp Web login page is the pivotal moment in the sign-in process. The QR code serves as a unique identifier that links your smartphone’s WhatsApp account to the WhatsApp Web session on your computer. It’s a security measure designed to ensure that only authorized users can access their WhatsApp account on the web. This step requires your phone’s camera to capture the QR code accurately.
By breaking down the sign-in process into these detailed steps, users can navigate through the process with confidence, ensuring a seamless connection between their smartphone and WhatsApp Web. Understanding each step’s purpose enhances the user experience and ensures successful access to WhatsApp messages on the web platform.
Step 5: Scan the QR Code
Once you’ve selected “Linked Devices” on your smartphone, the app will activate your phone’s camera. This action prepares your device to scan the QR code displayed on the WhatsApp Web login page.
It’s essential to ensure that your phone’s camera is in good working condition and that there’s adequate lighting in the room to facilitate a clear scan. Position your phone so that the QR code fits within the camera frame, ensuring it’s neither too close nor too far for optimal scanning.
Step 6: Wait for the Session to Start
After successfully scanning the QR code, the connection process between your smartphone and WhatsApp Web will commence automatically. You’ll notice that the WhatsApp Web interface on your computer will reflect your phone’s activity, including your contacts, chats, and recent messages.
It’s important to wait patiently during this step, allowing the system to synchronize your WhatsApp data seamlessly. Once the session starts, you’re all set to enjoy the convenience of accessing your WhatsApp account from your computer’s web browser.
Additional Tips:
Make sure your phone has a stable internet connection throughout the process to avoid any interruptions.
If you encounter any issues while scanning the QR code, ensure that your phone’s camera lens is clean and free from any obstructions.
Remember to log out of WhatsApp Web when you’re done using it, especially if you’re using a shared or public computer.
By following these simple steps, you can easily sign in to WhatsApp Web using your smartphone. Enjoy the convenience of accessing your WhatsApp messages from your computer while staying connected on the go!